**This is an old revision of the document!**
LAMP Stack with a Twist!
ADVICE
Start early, please! There is a ton of information online about LAMP stacks, it’s super beneficial to read them and see what people do to get the software suite working. Also if it seems overly complicated you are probably looking in the wrong place. If you come across what you believe to be a solution to a step or how to complete a step and are unsure, reach out to SecDev and ask us to look it over.
DELIVERABLE
Anything that is in this color needs to be a screenshot. The other Steps and parts of the homework you can explain however you like, either with text or screenshots.
- update your topology with a new interface to represent the DMZ, and then connect the two servers to it, lIke you did for Windows, note the IP, DNS, Subnet Mask and Default Gateway next to the machine
- ALL commands used should make it into the report. Please format them nicely like DigitalOcean does. You can skip ones like ls and such, just make sure the main ones make it
- all text in this color is a screenshot to show completion and ensure clarity
- you do NOT need to explain installing the Operating System, just make it clear what Operating System you used, such as Ubuntu 18.04
- as per usual write your report how DigitalOcean does, if you are struggling to write it, reach out so we can work with you
USEFUL RESOURCE
Please note this might not be an exact match, but it’s worth reading
Step 0 - Prerequisites
During class you should of all setup your MariaDB Database Server. Or have gotten the “High-Level How-To” do to it. If you did not, or do not think it’s setup correctly please reach out immediately so SecDev can help you get it sorted out. Use the troubleshooting commands and techniques gone over in class during the Services lecture
However… we may not have gone over it in class. SecDev forget's too! Setting up the database is fairly easy when regarding Wordpress. Below is the “High-Level How-To”.
Install VMWare Tools!
sudo apt install open-vm-tools open-vm-tools-desktop
- after installing some form on Linux server and connecting it with a static IP run
sudo apt update - then install MariaDB (wrapper for MySQL) -
sudo apt-get install mariadb-server mariadb-client - now we need to run the MySQL secure installation script,
sudo mysql_secure_installation- make sure to say YES to remote login, and setup a new password (make sure the remember this!)
- then login to MariaDB
mysql -u root -p - follow Wordpress's steps to setting up the database
- PAY CLOSE ATTENTION TO SETTING UP THE EXTRA USER
wordpress-user - make sure the give this user privileges
Step 1 - Apache
On your Web Server machine install any version of Ubuntu, this can be Ubuntu 16.04, 18.04 or whatever you like, also feel free to use either the server version of Ubuntu or Desktop version. Remember version matters when Googling for help.
TASKS
- install whatever version of Ubuntu you like
- connect it with a Static IP remember this is on the DMZ! 10.43.TEAMNUMBER.1/24
- ensure connectivity using these commands
$ ping 10.43.TEAMNUMBER.1$ ping 192.168.254.254$ nslookup ubnetdef.org
- install apache (you will need to do this through Ubuntu’s package manager)
- after installing apache you may need to start the service (refer to the services lecture!)
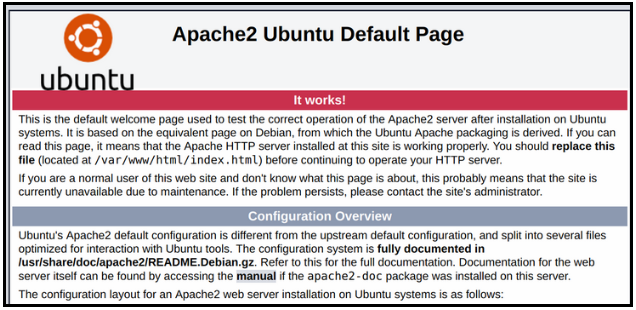
- to ensure apache is installed, using either your Windows 10 client or Ubuntu Desktop client, use a browser and go to the IP off the Web Server, you should see this page below
If you do not have this page after completing the above steps. DO NOT PASS GO OR COLLECT $200. REACH OUT ON MATTERMOST after collecting $200, and getting Apache to work you can move into Step 2
Step 2 - Install PHP
In the linked guide in USEFUL RESOURCE above there is great instructions in getting the proper PHP modules onto your system. If you have questions please reach out. You may need to Google around for “PHP and Wordpress”.
sudo apt update
sudo apt install php libapache2-mod-php php-mysql
These commands above generally work, but may not always… remember computers are hard!
Make sure the full set of commands you used ends up in your report.
Step 3 - Install WordPress
TASKS
- change directory into /var/www/html
- grab WordPress
wget http://wordpress.org/latest.tar.gz- untar Wordpress and move it a directory down (when you untar WordPress it will make a directory, you want the files in that directory to be moved into
/var/www/html
- remove the index.html file
- change ownership:
sudo chown -R www-data:www-data /var/www/html
- restart apache and view that status of the service to see if there is errors
- navigate to the IP Address of your Web Server like you did in Step 1
- except you need to do http://IP_of_Web_Server/wp-admin
- you should be prompted to finish connecting to the remote database you setup in class and then configure WordPress

